
If Logged in to MySirenum the candidate can select Change Password from the Menu. This will ask them to enter in their existing password and create a new one.
If the worker is at the login page, they will need to select Forgotten Password. After pressing this option, the worker will need to enter in their Email Address and Date of Birth.
If the details are correct with what is in the Sirenum system this will trigger an email. The worker will follow the instructions in the email to set up and new password.
Once completed they can then log into MySirenum.
To access the manager features, firstly the Client Contact will need to be set up to have Manager Mode. This is done through the contact record and within the MySirenum Access provide Manager Mode access. The Client Contact will need to be set up as a manager for the site.
Once access has been provided, have the manager log into MySirenum. Open the Menu and there will be an option called Manager. The Manager has the following abilities:
See all the ongoing shifts for that site
Clock candidates in/out using NFC capability or manually
Check who is on-site
Assign tags
MySirenum has lots of different features available to a worker. Using MySirenum opens up the lines of communication between the agency and workers. The worker has the following features:
Confirm they are on their way to a shift
Clock in and Clock out for a shifts
Check future shifts
State their availability while also requesting time off
Manually enter in their hours
Contact the office directly
Access the worker record, by going to Contacts. Locate the worker and on the Details tab enter in a valid Email address and Date of Birth for the worker.
Scroll down to the MySirenum Section in the Details Tab. Provide the appropriate level of access e.g. See Shifts.
You could set-up a temporary password for them which is located under the Description Information and Client Access.
Ask the worker to download MySirenum from the Google Play or App Store.
Have the worker enter in their Email Address and click Next. MySirenum will then check the details of the worker. Once finished, press Sign Up. This will generate an email to the worker where they can create their own password.
If a temporary password was created, this would be entered instead.
Once the password has been created, enter this in and press Login.
The worker is now set up to use MySirenum. Further information about how to set up a worker can be found using the following link. https://university.sirenum.com/topic/first-time-users
If a worker wishes to change their password this can be done through the menu, selecting the option Change Password. They need to enter in their old password and then create a new one.
MySirenum is available to download onto any Android or iOS device. The app can be found in either the Google Play or App Store.
To raise a Holiday Request using MySirenum. Open the Menu and select Holiday Request.
Once selected the worker can enter in the Start Date and Time along with the End Date and Time. After the details have been entered, the worker can submit the request.
The Holiday Request is available on the Schedule for that worker, and the consultant can see the details. The consultant has the ability to either Approve or Reject the request.
Depending on the outcome, the worker is able to see this by selecting Shifts in the Menu of MySirenum.
The Confirm button informs the agency the worker is On My Way to the shift.
The Confirm button becomes available 2 hours prior to the shift commencing. This can be changed but can only be done by a System Administrator within the Setup.
Your workers have the ability to provide details about their availability. e.g. Every Monday until 15th Dec the worker has University Lectures.
Using MySirenum, the worker can access the Menu and select Availability Periods. The worker would set their availability/unavailability.
Set the date range and time period the work is available/unavailable. The worker can the set if this request is for a specific day of the week or during the whole time frame.
Once the worker has saved the details this will appear on the Schedule.
Once Shifts have been assigned to a worker and Published. The worker can see them within MySirenum.
To view the shifts in a calendar view from the Menu select Shifts. This options shows the worker all of their future shifts.
Depending on personal Settings the worker will either see the shifts displayed in a Weeks view or Calendar view. If the worker would prefer to see shifts in a calendar view, click on the Menu again and under the Shift option the Calendar View is available.
Make sure that the worker has been onboarded correctly. Ensure their details have been entered into Sirenum correctly. Checking their Email Address, Date of Birth and MySirenum Permissions.
It’s worth mentioning it may take up to 24 hours after initial onboarding before the candidate can access the app. Please inform the candidate they might have to wait.
Ask the worker to tap on the Sirenum Logo within MySirenum. If a drop down menu appears this means they are connected to multiple environments.
Workers should only be connected to a Live (Production) system. Ask the worker to select the Live Environment from the drop down and ask the worker to login.
If this not the case, then check the workers details on Sirenum. While checking their details ask the worker if they have mobile signal or a WiFi connection.
If the details are correct on Sirenum, ask them to reset their password, run a Reload Companies and login.
This could be the worker has no Shift assigned to the worker or the Shift has not been Published.
Please ask your worker to see if there are any shift details (for example location, start/end time, etc.) located below the Start button.
Please check the Schedule to see if a Shifts have been assigned to the worker. If there is no Shift on the Schedule, please create a shift directly on the worker row and Publish the shift.
The worker will need to refresh the screen to see the update.
If this does not resolve the issue, please contact Sirenum Support with a screenshot of error and the steps the worker took when they go the error.
Please clarify with the worker when are they getting the error message.
What button are they pressing before this error happens?
Can they see the “Confirm” and “Start” button behind the error box?
If so, the worker is attempting to “Start” their Shift and not on-site. Explain the difference between the Confirm and Start button and that they can only start their shift when they are on-site.
If this does not resolve the issue, please contact Sirenum Support with a screenshot of error and the steps the worker took when they go the error.
A MySirenum user is not able to view shifts or the Confirmation button despite having been assigned shifts:
This is because the worker may have more than 1 record in Sirenum. This could be a duplicate record in Sirenum, check with the worker the email address they are using and which record has shifts assigned to them.
Remove the duplicate record.
It is possible to hide elements within MySirenum. This can be done by a System Administrator.
Go to the Setup Menu, using the Quick Find search for Custom Settings. Click Manage next to MySirenum, click Edit.
Locate “Hidden Elements” and enter in the menu option which needs to be hidden. See the image below for reference and the list of menu options’ names is also attached below.
The list of menu options’ names:
For Home, enter ‘menuHome’
For Shifts, enter ‘menuShifts’
For Time Entry, enter ‘menuTimeEntry’
For Gross Pay, enter ‘menuTimesheets’
For Make a request, enter ‘menuRequest’
For Event, enter ‘menuEvents’
For Manager, enter ‘menuManager’
For Find Shifts, enter ‘menuAllShifts’
For NFC Scanner, enter ‘menuNFC’
For Create Shift, enter ‘menuCreateShift’
For Settings, enter ‘menuSettings’
For Office Details, enter ‘menuOffice’
For Change Password, enter ‘menuPassword’
For Log Out, enter ‘menuLogout’
For Exit, enter ‘menuExit’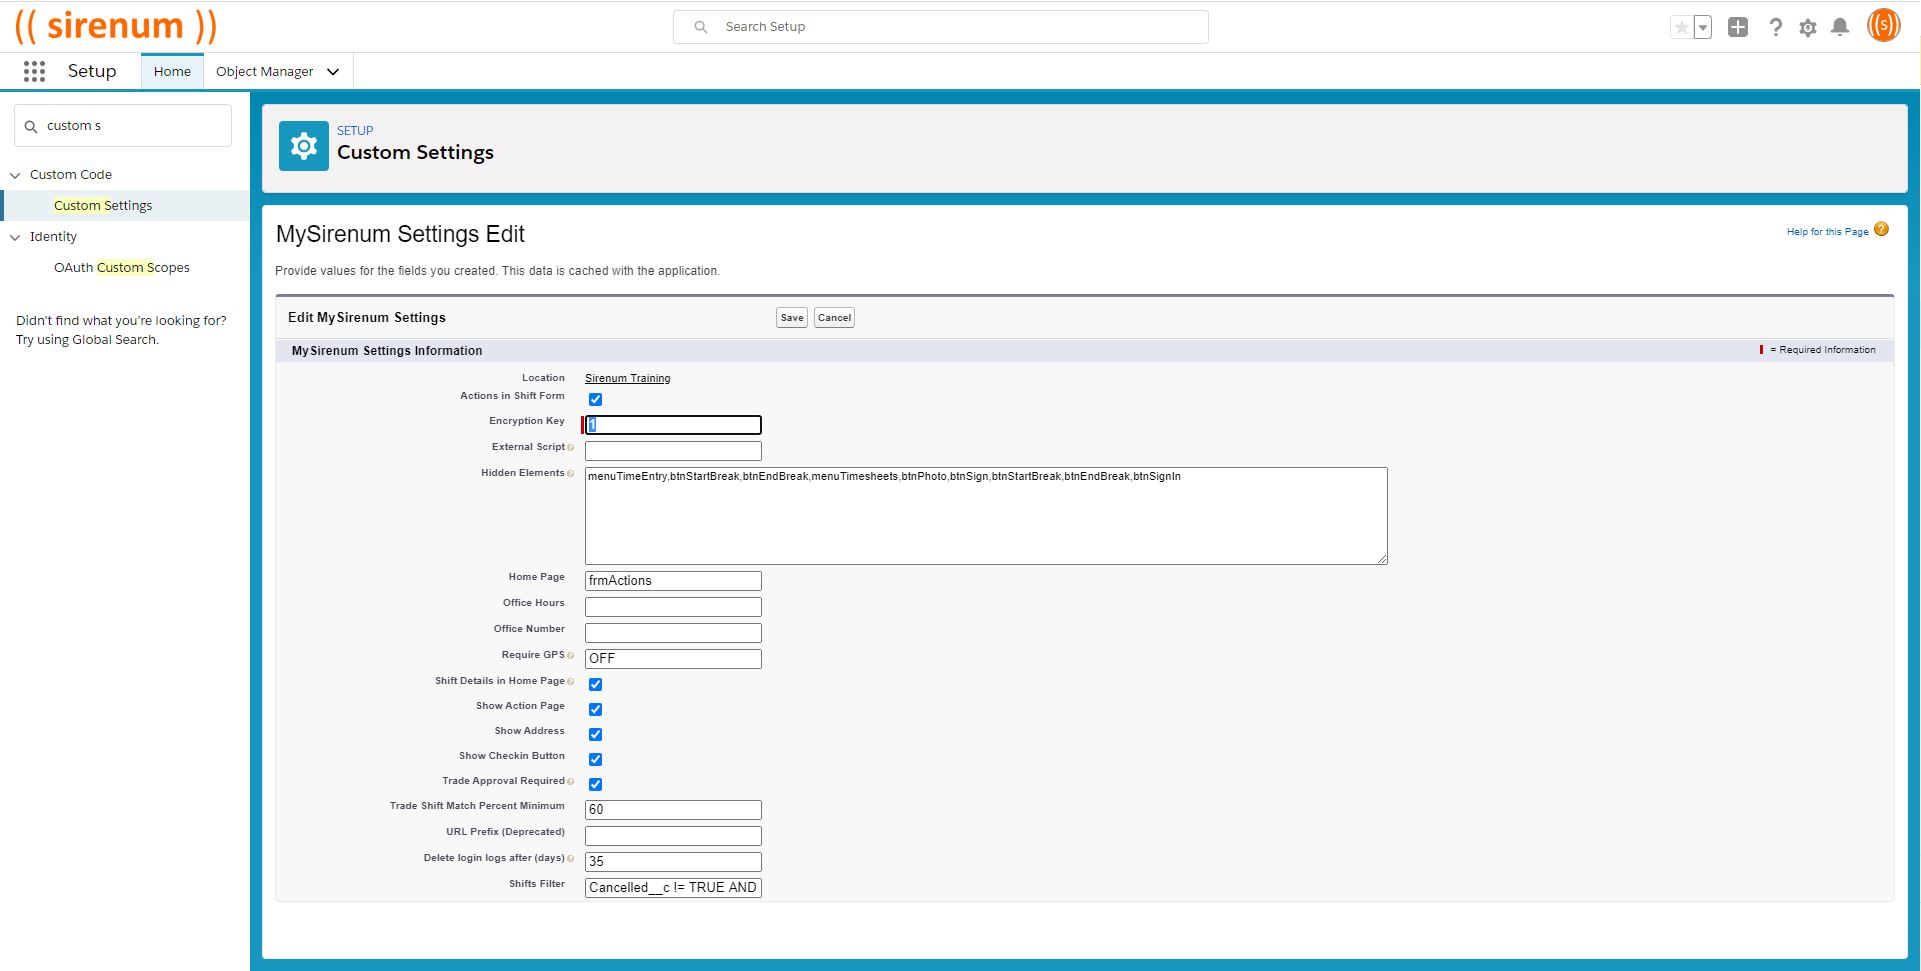
The worker has to be close to Site in order to Clock In (Sign-in) for their shift. Sirenum uses geo-fencing along with the mobiles GPS coordinates to allow for the Clock In process. If the worker is outside of the geo-fence they will receive an error message.
It is important to note that the worker can Confirm (On My Way) their shift from anywhere but to start a shift they need to be close to the Site.